
Handling routing in Next.js is straightforward due to its file-based routing system. Here’s a step-by-step guide on how to work with routing in Next.js
- Create Pages: In your Next.js project, create pages by adding .js or .jsx files in the pages directory. Each file represents a route.
- Link Component: To create navigation between pages, use the < Link> component from Next.js. Import it at the top of your file.
- Dynamic Routing: To create dynamic routes, use square brackets [] in your file names. For instance, pages/blog/[slug].js would allow for dynamic URLs like /blog/post-1 and /blog/post-2
- Accessing Route Parameters:- If you’re using dynamic routes, you can access the dynamic part of the URL by using the useRouter hook:
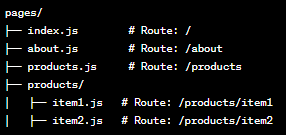
- Nested Routes: You can nest routes by creating folders and files. For instance, to create a nested route like /products/item1, create a folder structure like pages/products/item1.js.
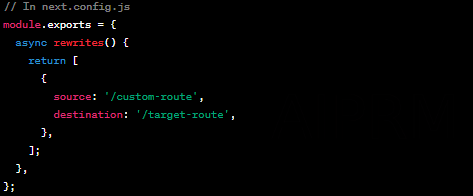
- Custom Routing: For custom routing, you can use the next.config.js file to define rewrites, redirects, and headers for your routes.
- 404 Page:- By default, Next.js provides a custom 404 page. If you want to create your own custom 404 page, add a 404.js file to the pages directory.

Use the < Link> component to wrap your anchor (< a>) tags and set the href attribute to the path of the page you want to navigate to.


Conclusion:-
Handling routing in Next.js is due to its file-based approach. You create pages in the pages directory, use the component for navigation, and can add dynamic or nested routes as needed. If you have specific routing requirements, you can also use the next.config.js file for custom routing configurations.

